Watch Out, da Vinci:
Intro to Drawing with the HTML5 Canvas Element
by Sue Smith
The ability to create drawings dynamically using JavaScript has made the canvas element one of the most talked-about features in HTML5. With canvas you can script complex 2D and 3D drawings as the user interacts with the page, even including animations. Although the possibilities offered by the canvas element are attractive to many designers and developers, getting started with it can be a bit of a challenge, particularly if you have little experience in JavaScript. However, the functions involved are accessible even to beginners, as I will demonstrate in this tutorial.
To explore the basics of creating drawings in HTML5, we will create a few canvas elements and implement some JavaScript code to draw shapes, customizing fill/ stroke styles and using randomness to mix things up a little. I will also demonstrate importing an image file to display within a canvas, then drawing on top of it. Finally, I will show what you can do with transformations in your canvas elements, using a simple translation effect.
Check out the demo to see where we're headed.
If you're new to JavaScript, you might want to open up book #4 in Keith's article, 7 Free eBooks that Should Line Every Web Professional's Digital Bookshelf, to use as a reference as you follow along with this article.
Set Up an HTML5 Page
To begin, create a new HTML5 page using the following outline:
<!DOCTYPE HTML>
<html>
<head>
</head>
<body>

</body>
</html>
A Quick Word on Compatibility...
Unfortunately, IE didn't get in on the canvas element fun until version 9. If you have many visitors using IE8, you'll need to ask them to upgrade or provide alternate fallback content. However, use of the canvas element is becoming more practical by the day, as over 80% of the world is now using a compatible browser.
Create a Canvas
In the body section of your new page, add a canvas element as follows:
<canvas id="moonPic" width="500" height="400">
   <!--default content for fallback in case no canvas support-->
   Whoops! Your browser doesn't support the canvas element...
</canvas>
The first picture we create is going to be the night sky with a full moon, so we give the element "moonPic" as its ID. We alse set the width and height, which you will do whenever you create a canvas element. The canvas drawing functions use a system of x and y coordinates.The point at the top-left of this canvas has an x coordinate of zero and also a y coordinate of zero. The bottom-right point is 499, 399 (x, y) since the area is 500 wide and 400 in height. (In case you're mind is wandering back to high school algebra class, this is just a vertical flip of the good ol' Cartesian coordinate plane.)
Between the opening and closing tags, you can place any content you want to appear if the user's browser does not support canvas, such as an alternative static image file or informative message as above. You can optionally use CSS to apply a border to your canvas element:
<style type="text/css">
canvas {
   border: 1px dashed #999999;
}
</style>
Add a Script
The work involved in drawing with the canvas is implemented in JavaScript, so add a script section after your canvas as follows:
<script type="text/javascript">

</script>
Note: We're placing our JavaScript within the body, but you could alternatively place a function in the page head or an external script, executing it on an event such as the page content loading.
Before we start drawing, we need to retrieve the context from the canvas element, so add the following inside your script tag:
var moonCanvas = document.getElementById("moonPic");
var moonContext = moonCanvas.getContext("2d");
This is what your canvas scripts will generally start with – the context of a canvas provides most of its drawing functions.
Color the Sky
Let's start by coloring the night sky. This is going to be a blue gradient that will fill the entire background of the canvas. Begin by defining the gradient:
// Define the gradient
var skyGradient = moonContext.createLinearGradient(0, 0, 0, 400);
// Add colors
skyGradient.addColorStop(0, "#000033");
skyGradient.addColorStop(1, "#000099");
The first line here creates a linear gradient, defining the x and y start and end points – the parameter values are the x and y coordinates of the start point followed by the x and y coordinates for the end point. In this case the gradient will run straight down from top to bottom, covering the entire canvas background. The last two lines add two color stops to the gradient. The color stops are at the very start and very end of the gradient, with dark blue running down into lighter blue. Now, fill the canvas with this gradient:
moonContext.fillStyle = skyGradient;
moonContext.fillRect(0, 0, 500, 400);
We instruct the context to use the gradient as fill, then apply it to a rectangle occupying the full available space inside the element – the first two parameters are the coordinates for the start point and the second two are the width and height:

Add Some Stars
Let's add some stars. Each one can be a simple white rectangle 1 pixel by 1 pixel in size, yielding a little dot of white light. We will use the fillRect method again, but this time we will also exploit some JavaScript utilities to add a dynamic effect to the image. First set the fill style to white:
moonContext.fillStyle = "#ffffff";
Now enter a loop, in which we will add 200 stars to the picture:
for (var i=0; i<200; i++) {
   // Looped contents will go here
}
If you aren't familiar with loops, don't worry; all you need to know is that this means the code inside the loop will execute 200 times. Inside the loop (before the closing } bracket) add code to choose x and y coordinates for a star at random:
var xCo = Math.floor(Math.random() * 500); //min 0 max 499
var yCo = Math.floor(Math.random() * 400); //min 0 max 399
If you haven't used random functions, again, don't be intimidated by this code; it's actually very simple. The numbers we have used in the function mean that each time the loop iterates, we will get an x coordinate between zero (inclusive) and 500 (exclusive) and a y coordinate between zero and 400, making the coordinates indicate a point within the dimensions of the canvas.
Still inside the loop, draw a 1 pixel rectangle at the random coordinates:
moonContext.fillRect(xCo, yCo, 1, 1);
If you save and open your page now, you should see the stars. Refresh the page to see that the random coordinates are generated again each time the page is viewed and the canvas rendered:

Draw the Moon
Notice that each element we draw is added on top of the existing image, so we always start at the background and work towards the foreground. Let's add a final element to the picture – the moon. After the loop you created for the stars, define another gradient, this time a radial one:
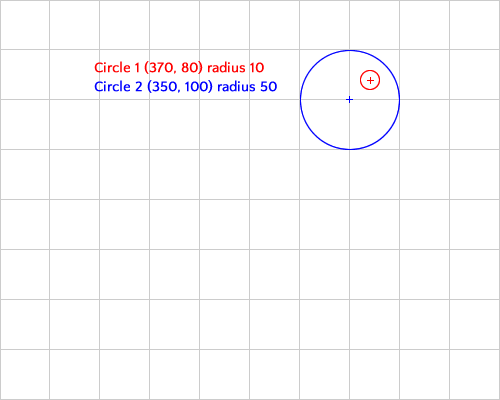
var moonGradient = moonContext.createRadialGradient(370, 80, 10, 350, 100, 50);
Radial gradients are a little more complex than their linear counterparts. The parameter values we supply represent two circles, one at the center of the gradient and one at its outside edge. The first two values represent the x and y coordinates at the center of the inner circle. The third value is the radius of this inner circle. The final three values indicate the central point (x and y) and radius of the outer circle. This will become a little clearer when we draw the circle, but here's a diagram to illustrate things:
Next, define the gradient colors:
moonGradient.addColorStop(0.3, "#ffffff");
moonGradient.addColorStop(0.9, "#ffff66");
This is similar to the code in which we set the linear gradient colors, but with white and yellow this time. Notice that these color stops indicate points that are not at the start and end of the gradient fill – this will make areas of solid color at the center and outer points of the shape, with the gradient between them. Set this gradient as the fill:
moonContext.fillStyle = moonGradient;
Now we need to define a circle path, so start as follows:
moonContext.beginPath();
We use an arc to define the circle:
moonContext.arc(350, 100, 50, 0, Math.PI*2);
The parameter values here represent the x and y coordinates for the central point of the circle, the radius, and finally two angles indicating where to start and finish the arc – for a circle this means going from zero to Pi multiplied by 2. (It's high school deja vu again, this time from trig class!) Don't worry at all if you don't understand the math here; it really isn't necessary – you can simply copy the code. Now apply the gradient fill to the circle:
moonContext.fill();
To keep things tidy close the path:
moonContext.closePath();
If you look at the line in which you define the radial gradient and the line in which you define the arc, you will gain a better understanding of the details. The circle as a whole has a radius of 50 with a central point of (350, 100). The outer circle of the radial gradient indicates the whole of this shape, while the inner circle indicates a portion of it (with a radius of 10 and a central point slightly up and to the right). Look again at the grid diagram above to see what I mean.
Open the page in your browser to see the result:

Not quite a da Vinci, but a nice start for your first drawing!
Import an Image
Now let's create another canvas and import an external image so that we can draw on top of it. Add a new canvas element using the same technique as before, but with different dimensions:
<canvas id="flowerPic" width="300" height="400">
   Whoops! Your browser doesn't support the canvas element...
</canvas>
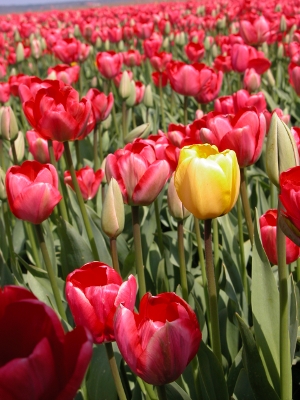
We will be importing the following image, which is 300 by 400 pixels – the same as the canvas:
Add another script section after the new canvas:
<script type="text/javascript">

</script>
Start the script using the same technique as before:
var flowerCanvas = document.getElementById("flowerPic"); // this code always must appear after the canvas definition
var flowerContext = flowerCanvas.getContext("2d");
Now create an image object:
var flowerImage = new Image();
Define what should happen when the image loads (we'll load it momentarily):
flowerImage.onload = function(){
   // Draw the image into the canvas
   flowerContext.drawImage(flowerImage, 0, 0);
};
The content of this function will execute when the image file has been loaded. We instruct the context to draw the image from the top-left corner of the canvas (coordinates 0,0) so that it will fill the whole available space.
Now, we will draw a circle outline on top of the picture – add the following inside the function, after the drawImage line:
   // Draw a circle - define stroke
   flowerContext.strokeStyle = "#ffff33";
   flowerContext.lineWidth = "2";
   // Define circle at coordinates (205, 180) with radius=50
   flowerContext.beginPath();
   flowerContext.arc(205, 180, 50, 0, Math.PI*2, true);
   // Apply stroke
   flowerContext.stroke();
   flowerContext.closePath();
We use the same technique as we used for the moon shape, but this time we draw a stroke rather than a fill, setting the stroke style and width. After the end of the current function (after the }; code), set the image's source to begin loading it:
flowerImage.src = "images/flowers.jpg";
Alter this to suit your own file if necessary. Load the page to see the effect:

The circle has, of course, been chosen to appear on top of a particular section of the image.
Apply Transformations
Let's finish by looking at a final, slightly more advanced example with a transformation applied to it. We will spend less time going through the details of the code here, focusing instead on the big picture of what is possible with the canvas element. So don't worry if you find some of the scripting confusing; just follow along and enjoy the possibilites! Start by creating another canvas and script:
<canvas id="transPic" width="400" height="300">
   Whoops! Your browser doesn't support the canvas element...
</canvas>

<script type="text/javascript">

</script>
Start the script in the usual way:
var transCanvas = document.getElementById("transPic");
var transContext = transCanvas.getContext("2d");
Add a background gradient as before, this time going diagonally across and down rather than straight down:
var dayGradient = transContext.createLinearGradient(0, 0, 400, 300);
dayGradient.addColorStop(0, "#0033ff");
dayGradient.addColorStop(1, "#0000cc");
transContext.fillStyle = dayGradient;
transContext.fillRect(0, 0, 400, 300);
Now add a circle to represent the sun, with a yellow fill and white stroke:
transContext.beginPath();
// Define a small circle at (25,25)
transContext.arc(25, 25, 20, 0, Math.PI*2, true);
// Fill it
transContext.fillStyle = "#ffff00";
transContext.fill();
// Stroke it
transContext.strokeStyle = "#ffffff";
transContext.stroke();
When you script with the canvas, you can use transformations such as translation, to move the point of drawing along the x and y axes, as in the following example code:
transContext.translate(50, 100); //move 50 right and 100 down
We are going to use a loop to redraw the circle multiple times. Each time, we will translate the point of drawing to the right and down the image, altering the opacity as we go:
// Redraw with translate
for (var j=2; j<17; j++)
{
   // Move across and down
   transContext.translate(j*2, j); //translate(x, y)
   // Define circle arc
   transContext.beginPath();
   transContext.arc(25, 25, 20, 0, Math.PI*2, true);
   // Alter alpha (opacity) with relative value.  Alpha is between 0 and 1; we want it to become less and less.
   transContext.globalAlpha = 1-((j-1)/15);
   // Apply fill
   transContext.fill();
   // Use full alpha for stroke
   transContext.globalAlpha=1;
   transContext.stroke();
}
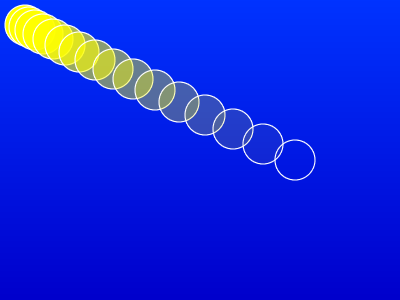
Take a moment to look over this code, as it isn't as complex as you may think. The loop will iterate 15 times, redrawing the circle each time. Every time the loop executes we move right and down using the translate method, increasing the amount we move along the axes incrementally by using the loop counter variable to calculate the x and y values. We use the exact same code as we used for the first circle to define the arc, but each circle is drawn at a different location because of the translation effect. We set the alpha level for the fill to decrease each time the loop iterates and apply the white lines with full opacity. The reason we start the loop counter at 2 is so that we can use it more easily in the translation and alpha effects – if it started at zero or 1 this wouldn't have the desired effect of gradually increasing the translation and decreasing the opacity.
Here's the final result:
Why Is This So Important?
As great as canvas drawing is, you might be asking yourself: "What's the big deal? I can do all this in Photoshop in about 30 seconds!" That's completely true, and if you're trying to create static images you should stick with Photoshop. What makes canvas drawing so special is that it's all dynamic, happening at the instant you use a script to do the drawing. This means you can create interactive graphics (e.g. charting), animations and much more, whenever you need it, taking into account changing data and/or user input. The dynamic nature of canvas drawing opens up a wide world of potential applications.
Conclusion
A closing reminder: As you have fun with this HTML5 feature, make sure you include alternatives for users without supporting browsers if you're providing content that's mission-critical. Fortunately, we're rapidly moving towards full browser adoption – we just have to wait a little longer on IE8.
In this tutorial, you've learned the basics of scripting your own drawings using the canvas tag in HTML5. Beyond what we covered, there's even more available – such as support for text, bezier curves and complex shapes. While we focused on 2d drawing, support for 3d drawing is in the works too, so the possibilities are only going to expand.
Happy drawing!