Overcome Common Styling Issues with CSS3 Psuedo-Elements
by Keith Bryant
A Brief Introduction
CSS Pseudo-Elements have come a long way since their introduction with CSS1 nearly sixteen years ago. At the time, there were only four pseudo selectors, :link, :visited, :hover, and :active, all of which dealt with link states. The number of available selectors has increased considerably in the years since, and pseudo-elements can now be used to execute a number of interesting design techniques without the need for additional HTML markup or ugly image hacks.
With the demise of IE6 (Microsoft celebrated its death in January when usage dropped below one percent) and one of IE7's feet firmly planted in the grave, you should no longer worry about using CSS3 pseudo elements in your designs. If you're still worried about your cave-dwelling IE6/7 audience, you can write simple CSS fallbacks or find a javascript library (like this one) that could trick the ancient browsers into doing what you need.
Let's jump in and look at some of the available effects.
Creating a Dropcap Effect
First, we'll start with dropcaps. Without using a CSS pseudo element, we might implement a dropcap in the following manner, starting with the CSS:
.dropcap {
	float: left;
	padding-right: 10px;
	color: #600;
	font-size: 64px;
	font-weight: bold;
	line-height: 54px;
}
And its corresponding HTML:
<p><span class="dropcap">L</span>orem ipsum dolor sit amet ... </p>
The result is the dropcap effect below (as viewed in Chrome's Web Inspector):

That looks fine, but having to add that span class every time you want to achieve the dropcap effect is rather tedious. What if you want the dropcap effect at the beginning of every post and your blog has a number of contributing authors? As webmaster, you'd be forced to communicate to each author how to add the span class. That is, unless you want to add the code yourself. I don't know about you, but I'd prefer to avoid the hassle.
We can implement the dropcap using a couple CSS pseudo elements, namely :first-child and :first-letter. Multiple pseudo elements can be combined merely by appending them to each previous one, like so:
p:first-child:first-letter {
	float: left;
	padding-right: 10px;
	color: #600;
	font-size: 64px;
	font-weight: bold;
	line-height: 54px;
}
In my case, I've just replaced the .dropcap selector with the above code in the CSS and entirely removed the span from the HTML. This method is preferable in that there's no additional HTML markup and, if a styling change to the dropcap is desired, no old posts have to be updated. In the following screenshot, notice how there are no extraneous span classes needed:

Consistent Paragraph Spacing
Paragraph spacing is another area where pseudo-elements help to avoid overcomplicating a simple issue. I've seen far too many layouts where the CSS author has specified paragraph spacing in a general rule such as p { margin-bottom: 20px; }, failing to take into account the final paragraph. If you have a content div with padding set as #content { padding: 20px; }, you'll notice the final paragraph appears to have a taller bottom margin than the other paragraphs. While this is not actually the case, it should be obvious why it may look this way. Combining the final paragraph's margin with the padding you set on the content div, you have 40 pixels of spacing above the footer:

Of course, you can easily fix this by setting the padding on the content div to something like #content { padding: 20px 20px 0 20px; }, thus removing the bottom padding, but what if your post ends with an image, not a paragraph of text? It could be wrapped in <p> tags which would give it the bottom margin it needs, but setting the content div's padding in this manner just doesn't make sense to me. It's not a clean, neat way to approach things.
I'd prefer to do something like the following: set paragraph spacing as we did above, but this time use a second rule:
p:last-child {
	margin-bottom: 0;
}
Using this technique, you'll end up with a bottom margin on all paragraphs except the final one:
Doesn't that just look better? The obvious takeaway here is that you can use the :last-child pseudo-element to fine-tune spacing and formatting on any element – or group of elements – on the page. There are many possibilities.
Focus Indicator for Input Fields
Although browsers like Chrome or Safari will outline the focused input field with a fancy border, what if the design you're working on calls for disabling the browser-specific outlines, while still providing a visual indication of which field is in focus? This can be achieved by using the :focus pseudo element in combination with a background color.
Here I've created a form with two input fields and a text area and used the following two declarations to style the fields:
input:focus, textarea:focus {
   outline: none;
   background: #f7ea71;
}
This rule produces the following:
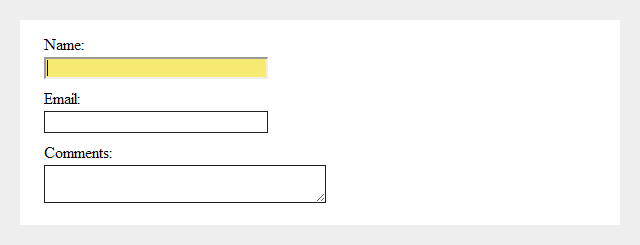
This is another one of those small touches that helps create a thoroughly consistent visual experience for your visitors.
Text Selection Color
This final one is an "easter egg" of sorts, as there's a good chance your site's visitors will never even notice it. If they do, however, a text selection color that fits your site's color scheme is a nice touch. As there appears to be a bug in Firefox where it ignores the ::-moz-selection selector if it's chained with the standard ::selection selector, I've used the following two rules to set a text highlight color:
p::-moz-selection {
   background: #f7ea71;
}
p::selection {
   background: #f7ea71;
}
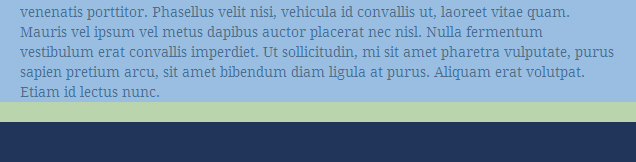
The following text selection is produced:

You can use this code to specify a color that complements your design. If you want to set the selection color for your entire page (not just a paragraph), use these slightly-modified selectors:
::-moz-selection {
   background: #f7ea71;
}
::selection {
   background: #f7ea71;
}
Want to Learn More?
The techniques above only scratch the surface of what can be accomplished using CSS3 pseudo-elements. Nicolas Gallagher is an authority on the topic and wrote a lengthy article for .net Magazine a while back, An introduction to CSS pseudo-element hacks. It sheds light on several more advanced techniques and contains some links to helpful resources, including another excellent post by Chris Coyier, A Whole Bunch of Amazing Stuff Pseudo-Elements Can Do. Both touch on the more advanced :before and :after pseudo-elements, which allow you to append or prepend content to elements. Even more possibilities!
Please feel free to ask questions or share your experiences using pseudo-elements in the comments section below.