 Download Help PDF (29MB) | Search:
The Flex integration feature allow you to use XFS v4 slideshows as a part of existing Flex projects. This feature is only available in the Pro version of the software.
Note: If you want to integrate in a Flash project, see this topic.
There are several prerequisites for Flex integration:
You must use Dreamweaver to create the slideshow which will be integrated into the Flex project. First, create a separate HTML page to hold the slideshow. This page won't be viewed online; it will only be used to hold the slideshow, allowing you to make edits. Important: To ensure that all paths are correct and functional, it is critical that you save this file in the same directory as the HTML page which displays your Flex-created SWF. For example, if your main Flex file is viewed at http://example.org/index.htm, then the slideshow holder page should be something like http://example.org/slideshow_holder.htm. In Flex, you often won't be running/debugging directly from the deployment directory; instead, you'll be using a bin-debug/ directory. In these cases, where your preview page is located in some other folder than the display folder (e.g. http://example.org/bin-debug/myProject.html in the above example), then the slideshow will not load while debugging/previewing prior to deployment. Rest assured, though, that it will appear properly when viewed in the context of the deployment file structure. You can verify this by moving the relevant bin-debug/ files (including the main Flex HTML page) to the folder where your slideshow holder page is located and viewing the Flex HTML page from there.
When you deploy your Flex project, you will have to upload all of the slideshow-related files as detailed in the slideshow insertion portion of the manual. Failing to upload all required files will result in the slideshow not appearing.
Once the slideshow has been inserted, select it and switch to Code View in Dreamweaver. Locate the initialization object where the slideshow HTML parameters are passed. This is the line which appears similar to the following:
XMLFlashSlideshow_v4({width:'300', height:'200', level:'a', xml:'v4flashslideshow/slideshow_data1.xml', backgroundColor:'#000000', backgroundAlpha:'1', preloaderTextColor:'#999999'});
Note the bolded code, which starts with { and ends with } (the curly braces). This is the actual initialization object which passes important information such as the dimensions, the XML configuration file path, background color, etc. This is the slideshow parameter object which you will use later. When you make changes to the slideshow settings in the wizard, this parameter object may change, requiring you to update it in your Flex project (see below).
First, you need to download the XFSLoader SWC file which contains the special slideshow loader class. The XFSLoader.swc file is available here. Download it and place it in your Flex Builder project's libs/ directory; this will ensure its automatic inclusion.
Next, you need to configure the appropriate Flash Player version. This setting is dependent on the SWF version you specified in the 'Slideshow Type - Pro or Basic' pod in the Global Configuration and Playback Settings section of the main wizard when creating the slideshow. If you chose the Basic SWF, you can use the Flash Player 9 or higher. If you chose the Professional SWF, you must use the Flash Player 10 or higher. Failing to use the proper player version will result in your Flash project "breaking" when run.
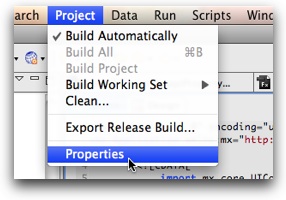
To set the required Flash Player version, open the Project Properties dialog by selecting Project > Properties in Flex Builder:

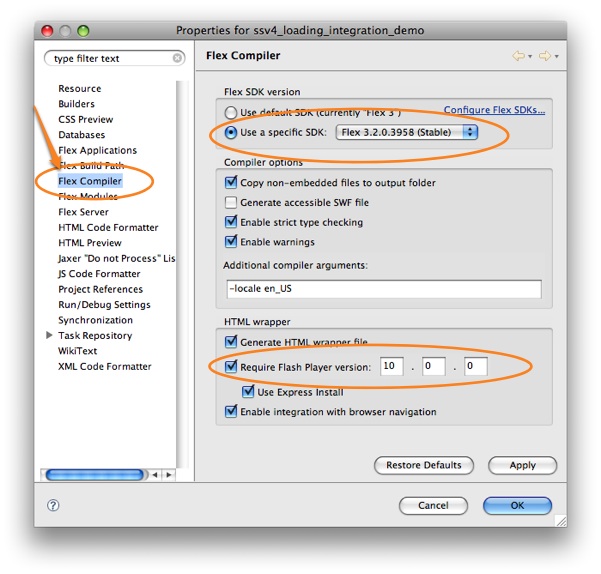
In the Properties dialog, select the Flex Compiler section on the left side:

Note: As mentioned above, this guide assumes (and highly recommends) that you are using the Flex SDK 3.2 or higher. This is required if you wish to target the Flash Player 10.
To set the Flash Player version, enter a value in the 'Require Flash Player version' box. For the Professional SWF, you should use 10.0.22 (short for 10.0.22.87) or higher; for the Basic SWF, you should use 9.0.124. While you could use 10.0.0 and 9.0.0, both of the listed point-release versions include important security updates.
Note: If you are not using the Generate HTML Wrapper file option (resulting in a grayed-out 'Require Flash Player version' box) and need to force the Flash Player 10 to be used, add -target-player=10.0.22 in the 'Additional Compiler Arguments' field.
You are now ready to add the slideshow code. Because all direct Flex display children must be UIComponent instances, the slideshow must be wrapped in a specific UIComponent holder, which is used exclusively to hold the slideshow. Open the Flex component Flex application where you wish to include the slideshow and add the following line to your MXML code:
This example uses an id value of slideshowHolder and it is positioned at 100,100. The position can be set to whatever you wish, but you should not explicitly specify dimensions; the dimensions are passed on the slideshow initialization object. The yet-uncreated createSlideshow() function is set to be called when the holder is added to the stage. It is important to note that the holder must be on the stage prior to any slideshow loading being initialized; doing otherwise will result in the slideshow failing with an error message. This is why the addedToStage event is used.
Next, you need to define the createSlideshow function and its supporting code by adding the following <mx:Script> block at the top of your MXML file:
You must replace the INITIALIZATION_PARAMETER_OBJECT_HERE value with the actual initialization code you earlier located in the slideshow HTML code. When updated, the line should look something like this:
var ssParams:Object = {width:'300', height:'200', level:'a', xml:'v4flashslideshow/slideshow_data1.xml', backgroundColor:'#000000', backgroundAlpha:'1', preloaderTextColor:'#999999'};
If you make changes to your slideshow in Dreamweaver which affect the initialization code, you'll need to update it in your Flex project as well.
In a nutshell, the code first creates variables to hold both the slideshow loader instance and the slideshow reference. Next, the createSlideshow function is defined. It defines the slideshow parameter object, which is passed to a new slideshow loader object (an instance of the XFSLoader class). Also passed is the holder to be used, which is the previously created slideshowHolder UIComponent instance. Finally, an event handler is added to provide a trace message if the loading fails.
It's really as simple as that. If you want to do some more advanced stuff (such as interact with the slideshow), see below. As mentioned above, just make sure to upload all of the slideshow-related files in addition to your Flex SWF file when deploying.
If your Flex preview/debug file is in a different folder than the deployment location, you won't be able to preview the slideshow when testing within Flex builder -- you'll receive an error message about the slideshow not being able to load. Rest assured, though, that the slideshow will appear properly when viewed in the context of the deployment file structure. For more information and how to verify paths while still developing, see the File Structure section above.
Additionally, when previewing locally you may receive a Flash Player security error message indicating that the file cannot be loaded, similar to this:

To fix this, you must add all of the SWF files being used (both your project SWF's as well as the v4flashslideshow/ supporting files folder) as trusted local content in the Flash Player security settings dialog. To learn more about doing this, see this topic.
Please note: This section is only for users familiar with AS3.
The XFSLoader class is defined in the XFSLoader.swc file which was added to your project earlier. It extends EventDispatcher and is never added to the display list; instead, the holder display object is passed to its constuctor. The constructor for this class takes two parameters:
There are several special things to note regarding the parameter object. First, the path to the appropriate SWF file is automatically determined using the path to the XML configuration file. If you have moved files around such that this path is not correct, you can manually specify the relative path to the appropriate SWF file (relative to the HTML page which will hold the Flex SWF) by adding an explicitly-defined swf parameter in the initialization object. Second, the slideshow is automatically masked to prevent unwanted overflow of the contents. If you wish to disable this mask, add a useMask:'false' parameter to the initialization object.
Once you have created the instance of the XFSLoader class, you can add event listeners for the following events which it dispatches:
Accessing the Loaded Slideshow
Once the SS_READY event has been dispatched, you can access the slideshow via the ss property on the XFSLoader instance. This provides a direct reference to the com.dwuser.ss4.ui.FlashSlideshow instance; this class is comprehensively documented in the API Reference. Note that this property is only available after the event has been dispatched; prior to that, it is null.
You can use the reference for adding event listeners or calling methods. The following example code shows both of these. First, a listener is added which displays the image XML each time a new image is synced. Then, a function is created which toggles autoplay when a separately-created button is clicked. The following complete detailed example builds on the basic example shown above; again, the INITIALIZATION_PARAMETER_OBJECT_HERE value must be replaced with the actual initialization code you earlier located in the slideshow HTML code:
The reference method shown above is the recommended approach: First, a separate ssRef variable is created to hold the reference to the slideshow. Then, whenever the ssRef is needed (e.g. when the play/pause button is clicked), an if statement is used to verify that ssRef has a value and isn't null.