 Download Help PDF (29MB) | Search:
This topic covers the various means by which you can position and size elements in your layouts.
First, it is important to note that all numeric size and position values are denominated in pixels.
There are two different positioning situations: positioning within an absolute-position container and a relative-position container.
Several containers implement absolute positioning. These include the Canvas and HoverCanvas containers, as well as the raw layout-view containers themselves (which are Canvas instances). In other words, when you drag a component directly onto the blank design area stage, it will be absolutely positioned. Note that all box containers (e.g. HBox, VBox, HFlowBox), the Panel, and TabNavigator do NOT implement absolute positioning; they use relative positioning. Absolute-position containers position each child in isolation without taking into account any of the other children.
Within absolute-position containers, you can use a combination of the following:
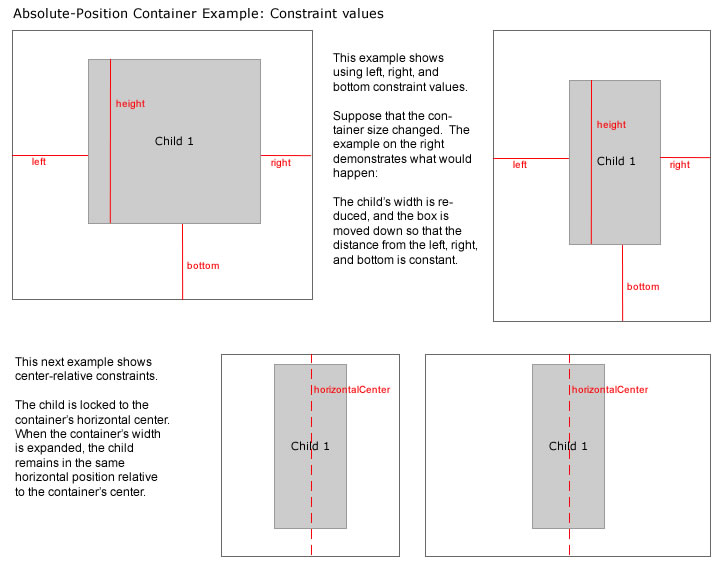
The following diagram illustrates the concept of constraint dimensions:
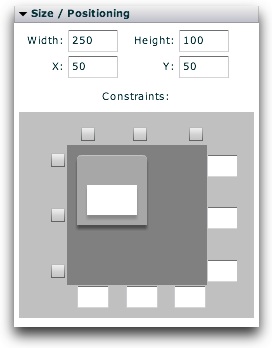
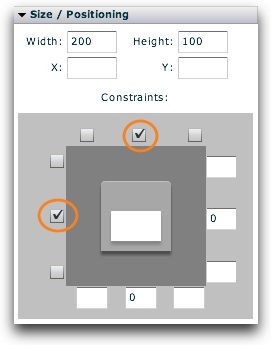
All positioning and sizing of elements in the wizard takes place in the Size / Positioning section of the Properties Panel. The section appears as follows for an element inside an absolute-position container:
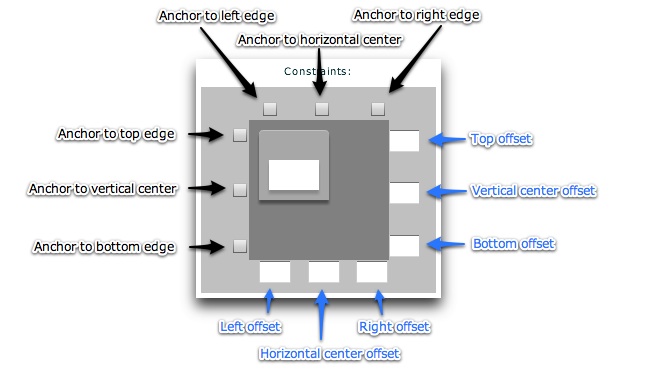
The following diagram notes each of the constraint controls:
If you want to convert the current position into an edge-relative position without any math, just check the appropriate checkboxes. If, on the other hand, you know the exact pixel offsets you want, you can enter them directly in the corresponding offset boxes.
At the moment, only the x/y and width/height values are set on the example element shown in the diagram above. This makes the element 250x100 px, positioned at (50, 50). Suppose you wanted to anchor the example element above so that each of its sides where always 50 pixels from each edge. To do this, you would enter 50 in the top, bottom, left, and right offset fields. This automatically checks the corresponding anchor checkboxes:
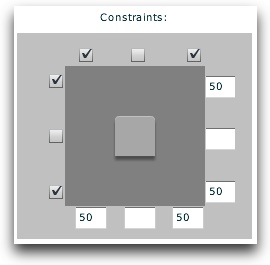
Establishing these constraints would override any existing widht/height values which had been set. On the other hand, suppose you wanted the element to be 200 x 100 px, and always centered both vertically and horizontally. In this case, you would set the following:
Note: As you make changes, they are reflected in the Design Area.
Note: Removing the width or height values applied to an element makes the element revert to using its default dimensions if no dimension constraints are in effect.
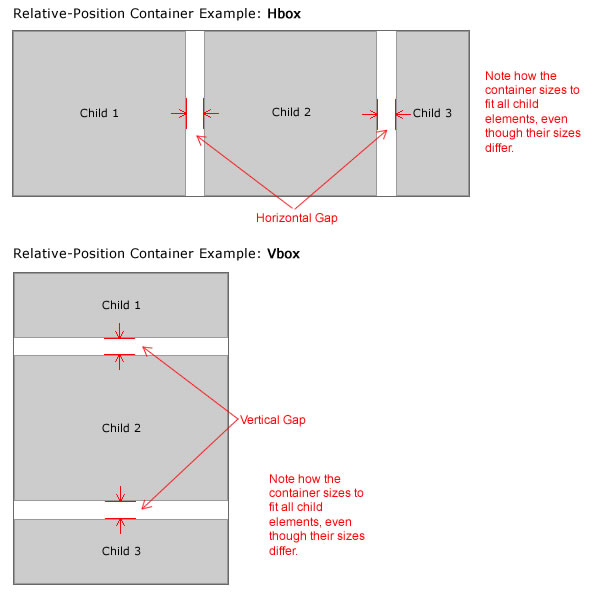
There are several layout containers which can be added to your layout that implement relative positioning. The most common of these are the box classes - HBox, VBox, HDividedBox and VDividedBox. Relative-position containers position each of their child components adjacent to each other based on the size of all children.
Within relative-position containers, only Element Dimensions can be used. All positioning is automatically determined by the container, based on the size and position of other sibling element(s). Explicit width and height values can be used, or you can allow the default element dimensions be used (default dimensions exist for most elements). Supported values include numeric pixel values and percentage values (e.g. 100%). If percentage-based dimensions exceed the boundaries of the parent container at runtime, they are automatically adjusted so that the element only goes up to (but not past) the edge of the container.
The following diagram illustrates the concept of two different relative-position containers -- the HBox and VBox, the most commonly used containers:
All positioning and sizing of elements in the wizard takes place in the Size / Positioning section of the Properties Panel. The section appears as follows for an element inside a relative-position container; it's simpler than the absoute-positioned counterpart:
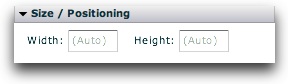
As you can see, there are only two settings: the height and the width. If you leave either blank, the value will be automatically determined for most elements. Additionally, removing the existing width or height values applied to an element makes the element revert to using its default dimensions.
In the wizard, you can also resize and reposition automatically by dragging. To reposition an element, click and drag in the middle of it:
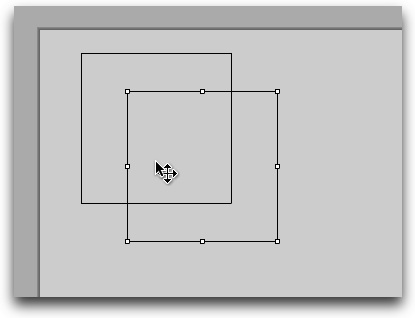
A 'move' cursor will appear. You can drag and drop elements from one container to another. If constraint positioning or dimensions have been established for the element, these constraints will be retained and only the offset values adjusted. On the other hand, if x/y positioning coordinates were used, these values will be updated directly. In other words, the wizard is intelligent and won't overwrite your positioning or sizing work.
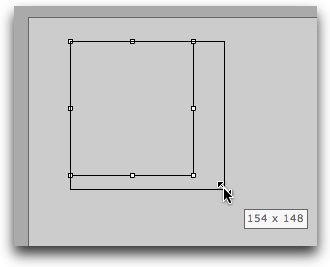
To resize an element, click it once to select it. On each corner (and on the middle of each side), a resize handle will appear. When you hover over one of these handles, a resize cursor will appear. If you click and drag, the element size will be updated as appropriate. A tooltip is shown while dragging to indicate the new effective size of the element:
As with dragging to move an element, all constraint positioning and/or constraint-based dimensions are intelligently respected and retained.