Free Add-On: Social Sharing for EasyRotator
by Nathan Rohler
We've had a number of EasyRotator users who have wanted to add social sharing integration to their rotators, so site visitors can share photos on Pinterest, Twitter or Facebook. Until now, this has been difficult or impossible to implement. Today, however, we're pleased to announce a free add-on and WordPress plugin that makes it easy to add social sharing to your rotators.
Check out this demo – just hover over any photo to access the sharing buttons:


Usage Instructions - EasyRotator for WordPress
Using Dreamweaver? Skip below.
To get started with social sharing, you need to install the EasyRotator Social Add-On plugin into your WordPress site:
- Download the latest plugin package from the WordPress.org repository.
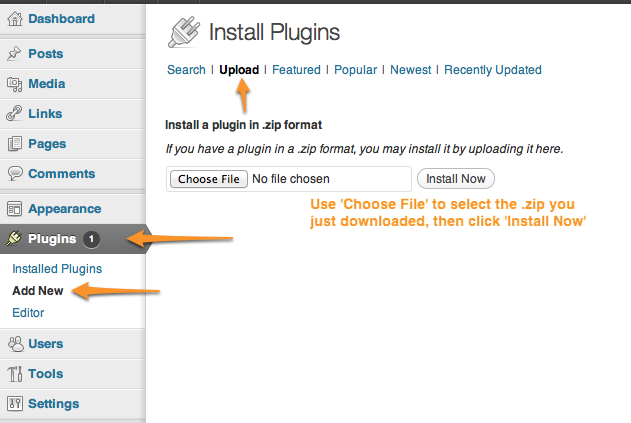
- Open the WordPress admin dashboard on your site and select Plugins > Add New. Choose the Upload tab, then select the .zip file you just downloaded. Click Install Now and follow the on-screen instructions to activate the plugin.
If you have any trouble with the installation, try installing manually.
Once the plugin is installed, you can enable social sharing for individual rotators or for all rotators.
Enabling Social Sharing for Individual Rotators
To enable sharing for a single rotator, locate the EasyRotator shortcode in the post or page editor. For example:
[easyrotator]erc_22_1234567890[/easyrotator]
Add a social="true" parameter to the shortcode:
[easyrotator social="true"]erc_22_1234567890[/easyrotator]
Save your changes and reload the page; hovering over the rotator photos should now reveal the social sharing buttons.
Enabling Social Sharing for All Rotators
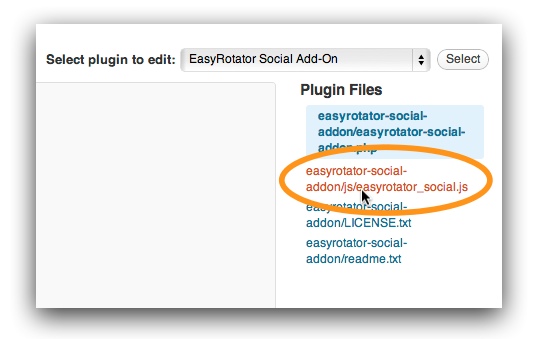
If you want to enable social sharing for all rotators, you'll need to make an edit to the plugin file. Select Plugins > Editor in the WordPress dashboard, select EasyRotator Social Add-On as the plugin to edit, then scroll down until you see the circled lines:

This is the code you're looking for (it will appear near the top of the file, just after the license):
// --- Config options ---
const APPLY_TO_ALL_ROTATORS = false;
Update APPLY_TO_ALL_ROTATORS to be true:
// --- Config options ---
const APPLY_TO_ALL_ROTATORS = true;
Then click Update File to save your changes. All rotators in your posts and pages should now be socially-enabled.
Usage Instructions - EasyRotator for Dreamweaver
To start, download the easyrotator_social.js JavaScript file from here and save it to your website. On your rotator page, add a reference to it just before the closing </body> tag:
<script type="text/javascript" src="easyrotator_social.js"></script>
Then, wrap your existing rotator in this special code:
<div class="socialEasyRotator">
   <!-- Begin DWUser_EasyRotator -->
   ...
   <!-- End DWUser_EasyRotator -->
</div>
Upload the new easyrotator_social.js file and your updated page, then refresh the page in your browser. Your rotator should now be social! Note that the social sharing options will only function properly when you're viewing the page online.
Customizing the Sharing Buttons and their Behavior
By default, three buttons are included – Pinterest, Twitter and Facebook. The Pinterest link shares the current photo, and the Twitter and Facebook links share a shortcut to the current slide along with the photo's title. If you're comfortable making code edits and writing basic HTML, CSS and JavaScript, you can customize these buttons and their appearance by editing the easyrotator_social.js file. (Need a jumpstart for your HTML, CSS and JavaScript skills? Check out the free e-books in this article.) If you're using the WordPress plugin, follow the directions above for using the plugin editor, but choose the .js file:
Here are the relevant lines, which define the buttons and their appearance and behavior:
    // --- Configuration Options ---
    var opts = {
        filter: 'div.socialEasyRotator',  This specifies which rotators should be made social
        spacing: 10,  This specifies the spacing between each of the buttons, in pixels
        position: {
            horizontal: 'center',   This specifies the horizontal alignment.  You can use left, center or right.
            vertical: 'middle',   This specifies the vertical alignment.  You can use top, middle or bottom.
            padding: 20,   If you use left or right or top or bottom, this specifies how far (in pixels) from the edge the buttons should be positioned.
            hOffset: 0,   This numeric value can be used to further tweak the horizontal position.
            vOffset: 0   This numeric value can be used to further tweak the vertical position.
        },
        pauseAutoplay: true   This specifies whether clicking on a social button should pause autoplay (if enabled)
    };

    // --- Button Definitions ---
    var floaterHTML = '<div id="erSocialFloater" class="erSocialFloaterDefault">' +
            '<a href="#" data-link="http://pinterest.com/pin/create/button/?url={link}&media={src}&description={title}" title="Pin on Pinterest">' +
                '<i class="erSocialIcon" style="background-position: 0 0;"></i>' +
            '</a>' +
            '<a href="#" data-link="https://twitter.com/intent/tweet/?url={link}&text={title}&via=dwuser" title="Tweet on Twitter">' +
                '<i class="erSocialIcon" style="background-position: -32px 0;"></i>' +
            '</a>' +
            '<a href="#" data-link="http://www.facebook.com/sharer.php?u={link}&t={title}" title="Share on Facebook">' +
                '<i class="erSocialIcon" style="background-position: -64px 0;"></i>' +
            '</a>' +
        '</div>';
    // --- Button CSS Styles ---
    var floaterCSS = '<style type="text/css">' +
        '   #erSocialFloater.erSocialFloaterDefault { line-height: 32px; padding: 0; height: 32px; }' +
        '   #erSocialFloater.erSocialFloaterDefault a { display: inline-block; width: 32px; height: 32px; margin: 0 0 0 ' + opts.spacing + 'px; text-decoration: none; border: none; padding: 0; }' +
        '   #erSocialFloater.erSocialFloaterDefault a:first-child { margin-left: 0; }' +
        '   #erSocialFloater.erSocialFloaterDefault a:hover { text-decoration: none; border: none; }' +
        '   #erSocialFloater.erSocialFloaterDefault i.erSocialIcon { display: inline-block; width: 32px; height: 32px; background: url(\'http' + ('https:' == document.location.protocol ? 's' : '') + '://easyrotator.s3.amazonaws.com/1/i/rotator/social/img32/sprite.png\') 0 0 no-repeat; }' +
        '</style>';
    $(floaterCSS).appendTo('head');
The configuration options are annotated above. In the next section, the button definitions, standard HTML is specified. You can edit this as desired to remove or add buttons. Note that each link uses the following format:
<a href="#" data-link="http://pinterest.com/pin/create/button/?url={link}&media={src}&description={title}" title="Pin on Pinterest">
The real sharing link is specified via the data-link attribute. It can contain each of these special values:
- {link} This is the permalink to the current EasyRotator slide.
- {url} This is the raw URL of the current page. You usually want to use {link} instead of {url} since it includes the permalink to the current slide.
- {src} This is the URL to the current slide image. This is usually only relevant for photo-sharing networks such as Pinterest.
- {title} This is the title of the current slide, as specified in the EasyRotator editor.
- {desc} This is the description of the current slide, as specified in the EasyRotator editor.
The base format for each of these links is based on the standard sharing link for each social network.
The <i> tag inside each <a> tag, along with the CSS definitions, control the images used. You can edit the HTML and CSS to use your own images if desired.
Important note: If you are a WordPress user and choose to manually edit the easyrotator_social.js file, you will want to make a backup copy of your changes, as future plugin updates will overwrite the file.
Advanced Options
Setting Page-Specific Configuration Options
You can override the configuration options on an individual page by adding some special code to that page. This allows you, for example, to change the positioning of the social buttons. Let's suppose you want to make buttons appear over the top-left corner of your photos instead of the center; to do this, add the following code to your page anywhere within the <body> or <head>:
<script type="text/javascript">
er_socialConfig = {
    position: { horizontal:'left', vertical:'top' }
};
</script>
You can selectively override any of the properties in the main option object defined in the easyrotator_social.js file.
Manually Disabling Sharing for an Image Display
If you're using a customized template and sharing buttons are appearing on a thumbnail display in addition to the main images, you can disable them for the thumbnails by modifying your layout source code. Locate the line that begins like this:
<div class="erimgMain" ... >
If there are two lines that look like that, you'll usually want to update the second. Update it like this:
<div class="erimgMain notSocial" ... >
View your page in a browser to confirm that the update was properly applied.
Conclusion
In light of the explosive growth of Pinterest and the established positions of Twitter and Facebook, it's important to be social when sharing photos online. We hope to make it easy with the new EasyRotator Social Add-On. If you have any suggestions, questions or feedback, please let us know in the comments below.